| PM |
PJA |
RDM* | DAM± |
PFM |
BCM |
BFM |
RCO |
|
|
|
|
|
|
|
|
|
| PM |
PJA |
RDM* | DAM± |
PFM |
BCM |
BFM |
RCO |
|
|
|
|
|
|
|
|
|
*As applicable to their Round ±As applicable to their Delivery Area
| Import Group Level or Standard Tasks |
| Add Unique Project Task Actions |
| Edit or Delete Tasks |
| Mark Tasks as Done |
| Add Costs to Tasks |
| Link Payments and Refunds to Tasks |
| Add Alerts To Tasks |
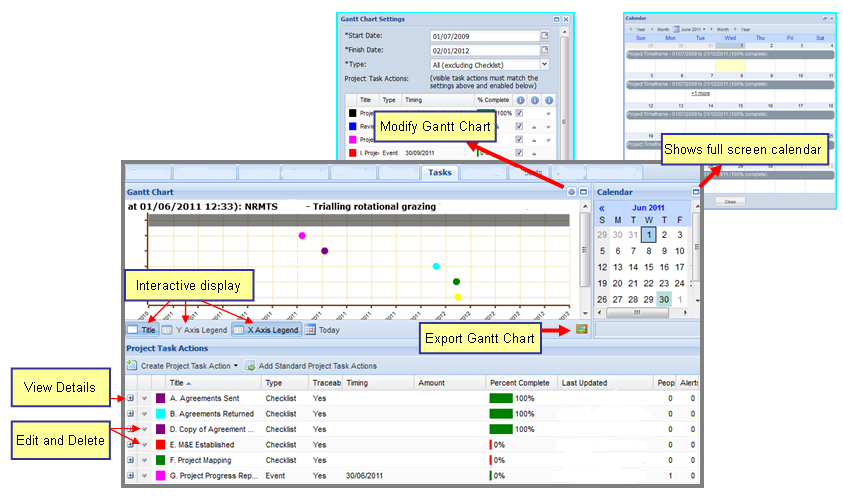
The Project Tasks tab is important in allowing Project Managers to track the progress of Project tasks or actions.
|
Tasks and Alerts can be set up to open communication channels with Enquire users about Project progress. For example, a Project Manager may wish to notify Project Team members when a particular Task is due. Also available is an exportable Gantt Chart that displays all Project Tasks on a time line and an embedded calendar which highlights important Project dates.
Tasks can be added to your Project from a Group Level (Standard) Tasks and/ or Unique Tasks
There are several different project task types:
| Type |
Explanation |
| Check list |
A task which can be done progressively and need to be checked as done or completed. |
| Event |
A task with a start date and no end date. |
| Activity |
A task with a start and end date. |
| Payment |
A task related to payments being made on the project. These tasks will also display on the Project Budget Breakdown tab. |
| Refund | A task related to refunds being made on the project. These tasks will also display on the Project Budget Breakdown tab. |
A (Standard) Project Task Action is a task that is usually undertaken by the group across the various projects such as final reporting at the completion of a project. Group Task Actions and Group Task Lists can be set up by your Administration User. This is done via My Group Menu. See the Manage Project tasks page.
1. Select the Projects tab from the Primary Navigation or from your Project portlet on the home page.
2. Select the Project name to view Project details.
3. Select the Tasks tab at the top of the page. Access to edit details will only be available to relevant users and the project or application must be Active.
4. Select Add Standard Project Task Actions from the Project Task Action Table.

5. Group Tasks Lists will be displayed when you select the down arrow.

|
6. Choose the relevant list by clicking on the title. Now you can view any Task Actions and linked Task Alerts in this Standard List. You can select those you wish to include in your Project by selecting or deselecting the checkboxes beside each one.

|
7. A red cross will be marked against the Group Task Actions you have selected which denoted action required.
Firstly, enter the Container by clicking on it. Select the Container from the drop-down menu or alternatively type in a new Container Name. Secondly, enter start (and end) dates. Note: Depending on how your projects and tasks are set up, you may be unable to edit details like the Container and key dates.
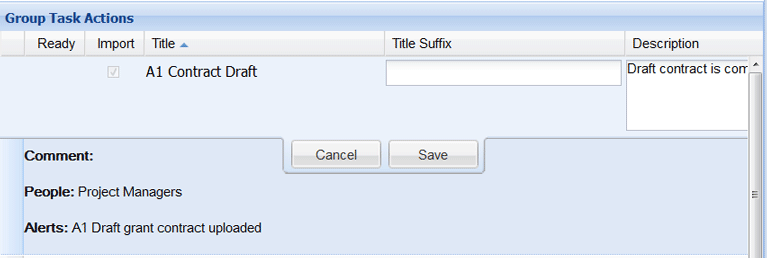
Expanding the + icon next to the Group Task Action name will display additional information about the task like attached Alerts. You will not be able to edit any of this information in this window but these can be adjusted after creation of the Task Action.
8. Select Save. The Task Action should be marked as Ready with a green tick.
9. Some tasks in a project need to be repeated during the project's lifecycle, like periodic site visits. Instead of recreating tasks, you can clone them to be repeatable. Pressing the Clone button will copy the selected Task Action. Cloned tasks can be edited separately to accommodate different requirements like start and end dates.

10. Once you are happy with your selected Task Actions, select Save.
11. You will now see the tasks plotted on the Gantt Chart.

|
A (Unique) Project Task Action is a task that is specific to the Project and is not drawn from the pool of Group Action Tasks (Standard Project Task Actions) that all Projects can choose from.
1. Select Projects from the Primary Navigation or from your Project portlet on the home page.
2. Select the Project name to view Project details.
3. Select the Tasks tab at the top of the page. Access to edit details will only be available to relevant users and the project or application must be Active
4. Select the Create Project Task Action drop down menu.
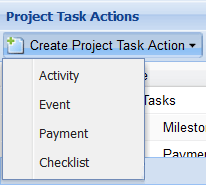
5. Choose from one of the Project Task Actions listed below.
| Task Action Type | Description |
| Activity | Runs between a start and end date. It can have a complete value between 0% and 100% (in 10% intervals). |
| Event |
Single date and can be either 0% or 100% complete. |
| Checklist |
Single date and can be either 0% or 100% complete. |
| Payment |
Single due date & can either be 0% or 100% complete. When you add a payment, it is also automatically added to the Payment Schedule from Tasks section on the Project's Budget Breakdown tab. |
| Refund | Single due date and can be either 0% or 100% complete. When you add a refund, it is automatically added to the Refunds section on the Budget Breakdown tab. |
7. Fill in the relevant text fields. * denotes mandatory fields.
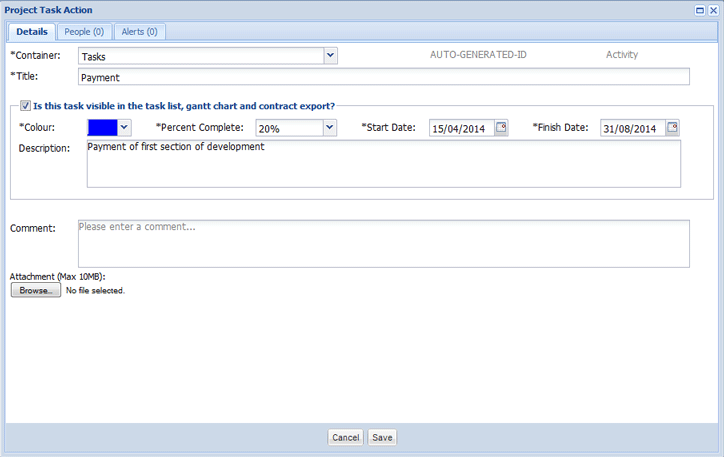
8. Once all the information has been entered, select Save.
Alerts can be created for each Task Action.
1. Select Projects from the Primary Navigation or from your Project portlet on the home page.
2. Select the Project name to view Project details.
3. Select the Tasks tab at the top of the page. Access to edit details will only be available to relevant users and the project or application must be Active.
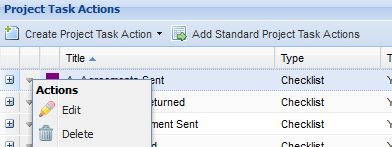
4. Your Tasks will be listed. Select the down arrow in the column next to the Action you wish to edit. Select Edit from the Action menu.
|
5. Make the relevant changes then select Save.
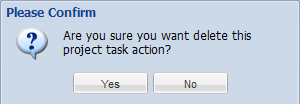
6. To delete a task action, select Delete from the Action Menu.
|
7. You will be asked if you are sure you wish to delete the item. Select Yes.
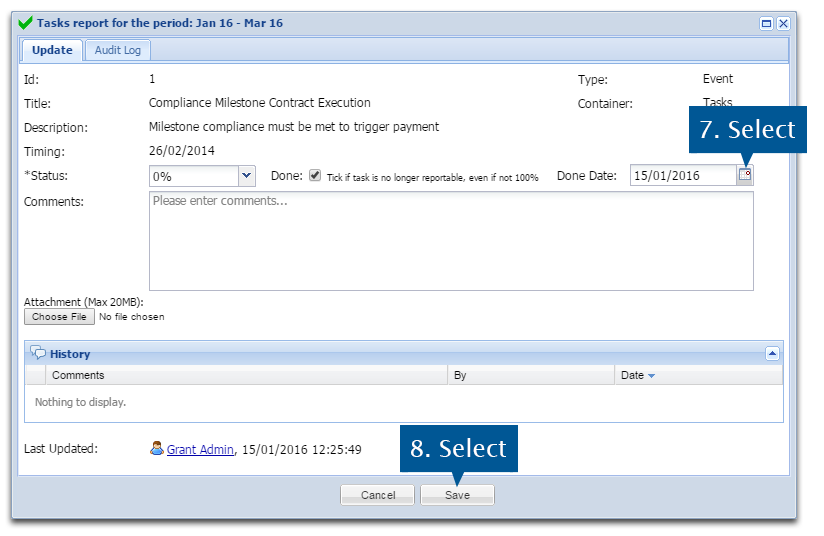
This feature can be used to mark tasks as completed or close ones that are no longer reportable. Tasks can be closed even if they are not 100% complete.
1. Select the Projects from the Primary Navigation.

2. Open the relevant project.
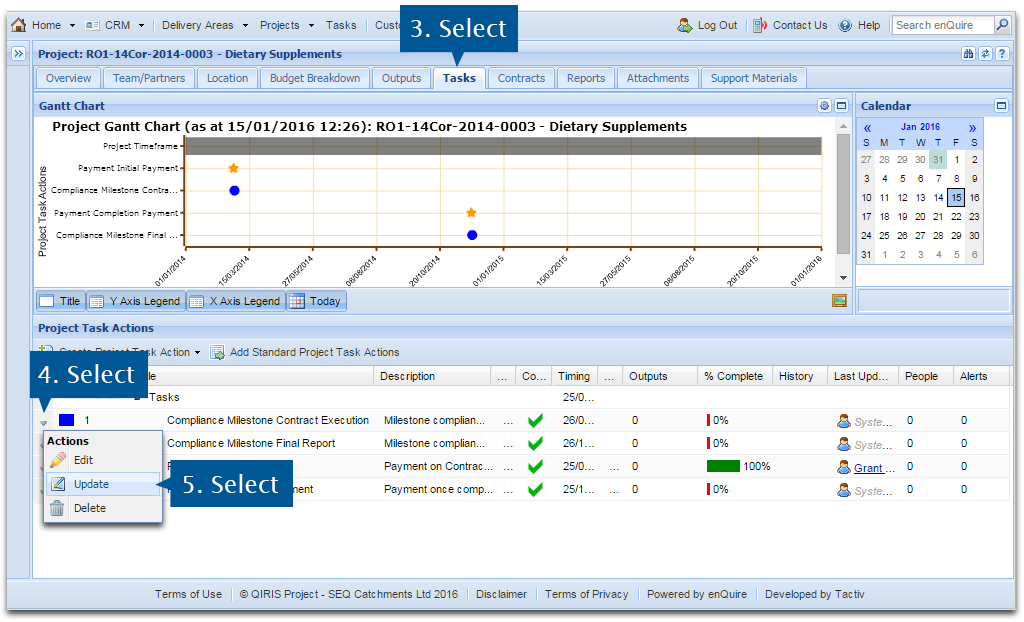
3. Select the Tasks tab at the top of the page. Access for editing will only be available to relevant users and the project must be Active.
4. Your tasks will be listed. Select the menu arrow next to the task you wish to edit.
5. Select Update from the menu.
6. Select Done.
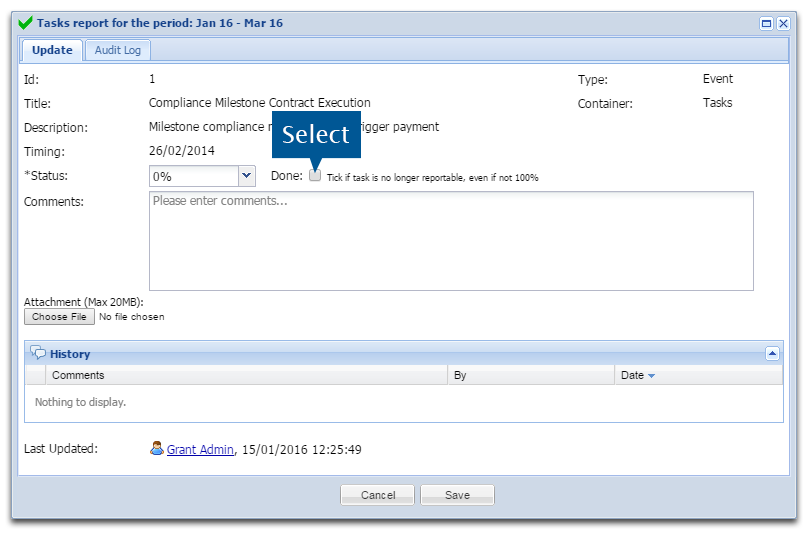
7. Use the calendar to enter a completion date.
8. Select Save to save your changes.
Note: This option is only available if your organisation has linked project financials to Project Templates. Please see your pages on Managing Project Costs and Budget Breakdown - Costs.
1. Select the Tasks tab within a project.
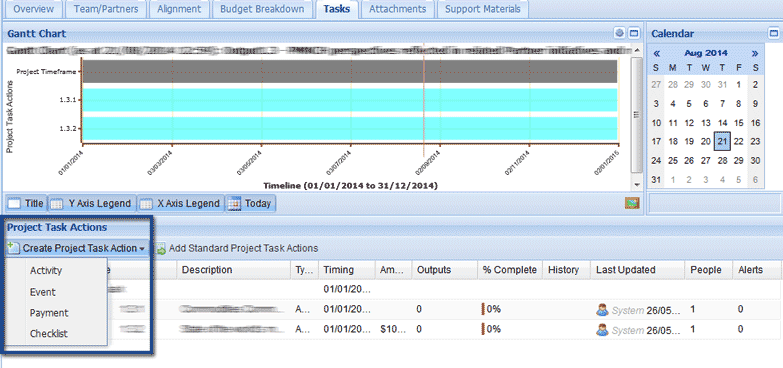
2. Select an Activity or Event from the Create Project Task Action menu (users are also able edit existing activities or events and add costs).
3. Fill in the necessary details like Container and Title. Select the "Does this have a cost associated to it? checkbox".
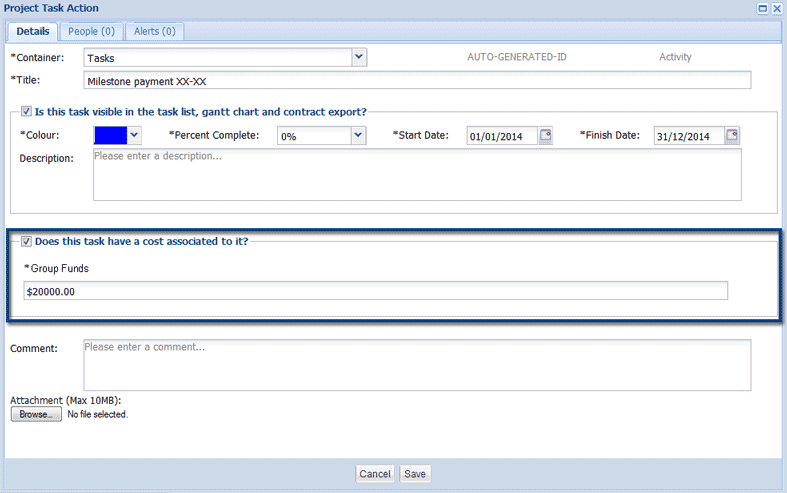
4. Input the cost amount and select Save.

Creating an activity or event with costs associated to it means that you will now be able to see the cost in the Budget Breakdown tab and the Tasks tab. When on the Budget Breakdown tab, please ensure that you have the Costs tab selected to be able to see all costs.
Payment and Refund tasks can be linked to other tasks, payments or refunds for additional tracking or compliance purposes.
1. Open the relevant project and select the Tasks tab.
2. Create or edit a payment or refund.
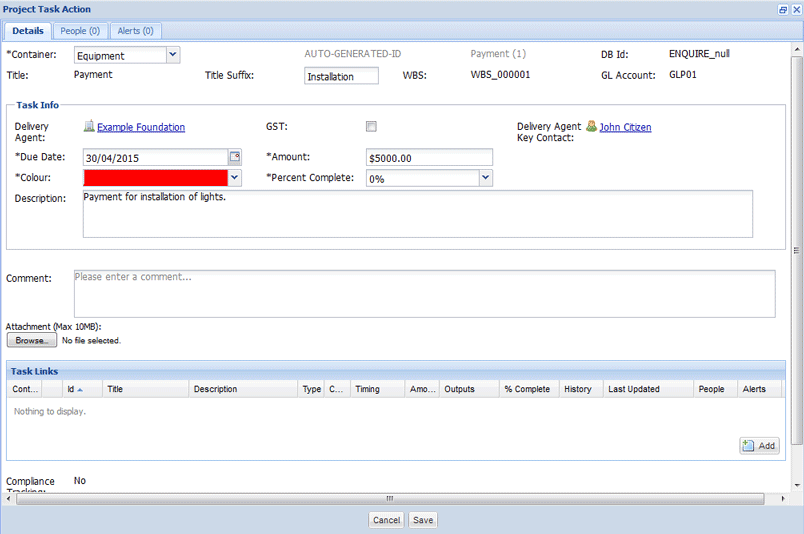
3. Select the Add button in the Task Links section to link the task to other tasks.

4. Select the checkbox next to relevant tasks and then use the Select button to link the payment or refund, and tasks together. In this example, we are linking to a completed task.
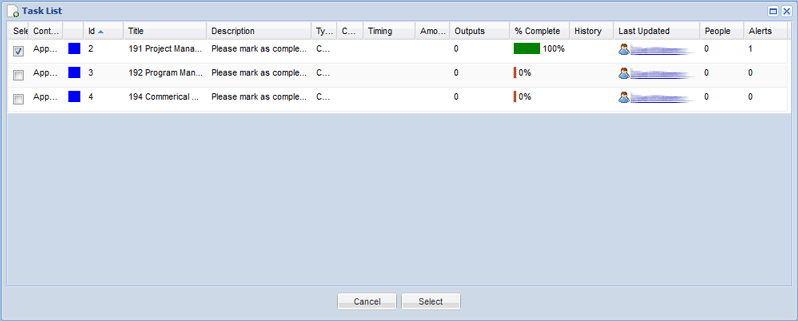
The tasks are now linked.
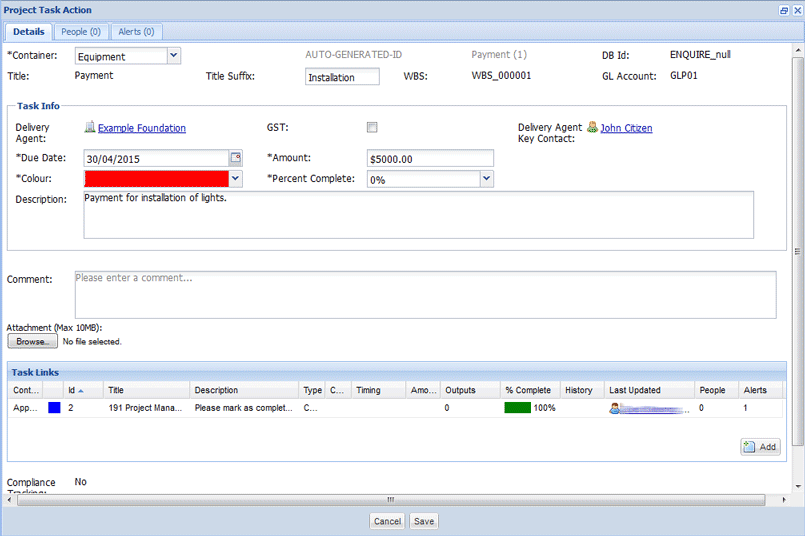
5. Select Save to create the task or save your changes to the existing task.
Alerts are a useful method of communicating with Project Contacts. These can be attached to Project Task Actions via the Tasks Tab. For help on how to Add Alerts which are not connected to Task Actions see the Project Alerts page.
1. Select the Projects tab from the Primary Navigation or from your Project portlet on the home page.
2. Open the relevant project.
3. Select the Tasks tab at the top of the page. Access for editing will only be available to relevant users.
4. View Project Task Actions box to see any existing Alerts are attached to your Task Actions.

5. Select Add Standard Project Task Actions from the Project Task Action Table.

6. Group Tasks Lists will be displayed when you select the down arrow. Pressing the plus icon will display Alerts linked to the Task Action.

|
7. Ensure to check both the Task and Alert will be imported and select Save at the bottom of the page.
8. View your new Task and Alert in the Project Task Action table.
9. View Project Task Actions box to see any existing Alerts are attached to your Task Actions. You can add many alerts against one or more Task Actions displayed in this table. If the Task Action you require is not displayed here, then either Add Standard or Unique Project Task (see steps above).

10. Edit the Task Action you wish to Add your Alert by selecting the drop down arrow to the left of the relevant Alert.

|
11. Select the Alert tab and the Create Alert button.
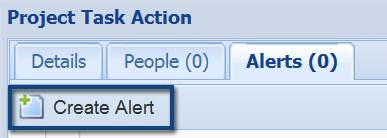
12. Enter the mandatory information in the relevant fields on the Details Tab.
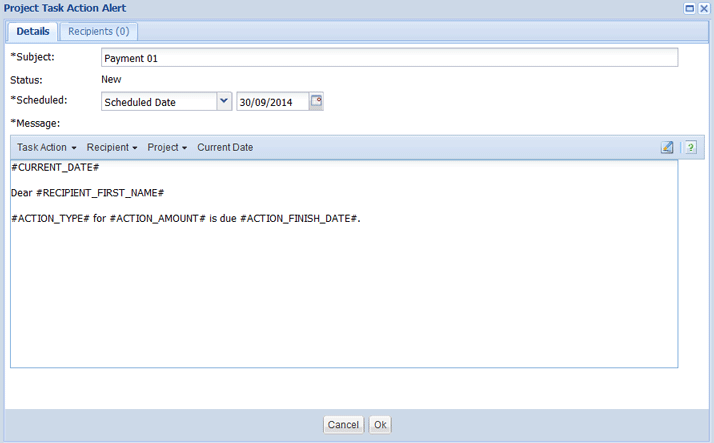
13. Then select the people who will receive the Alert via the Recipients Tab and select Ok.
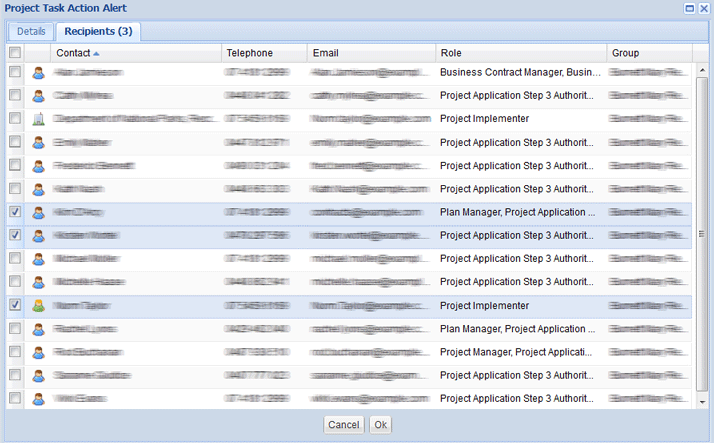
15.Check the information entered is correct and Save.
It is possible to create Alerts by navigating to the Alert Tab, however those alerts will not be connected to traceable or non-traceable Tasks.